Create A Free Gmail Account
Need to get started with a new e-mail address? You can create a free Gmail account in minutes and before you know it you’ll be sending and receiving your first e-mails with your brand new e-mail account. E-mail accounts with heaps of storage have become ridiculously cheap thanks to the decreasing cost of computer storage space, which is why you shouldn’t have to pay for your e-mail service nowadays.
Regardless of where you live, most internet service providers offer one or more free e-mail accounts as part of their subscription plans. Some of them, however, will not offer you the level of robustness and sophistication of a free Gmail account. (Keep reading for some helpful words about what makes Gmail different from other e-mail accounts).
How To Create A Free Gmail Account
If you’re ready to go ahead and create a free Gmail account, please refer to my article with detailed instructions on creating your very own Gmail account. The link will open in a new window so you can easily close that window when you're ready to continue reading here. The article contains all the necessary steps with screenshots included to get you up and running with your new e-mail account. Of course it also contains a link to the exact location where you need to be to sign up for the account.
All set up and ready to dive in?
If you’re still reading here, I’m going to assume that you’ve successfully completed the steps to create a free Gmail account as described in the article mentioned above and I would like to introduce to you a few great Gmail tips and tricks that will make your life a bit easier.
Search Messages
Google is best known for search. It helps you search the internet but the same extremely efficient search technology can also help you search specific e-mail messages.
Let’s take a quick look at some examples to get a feel of how the search functionality works. If you enter “laura” in the search box, Gmail will search for any message that includes the word laura.

If you want to see every message that was from a person named Laura, you’d type “from:laura” in the search box.
Pretty much in the same way, you can also search for messages that were send TO a certain person by typing “to:” (without the quotes) and then the name of the person in your search box.
You’ll also notice as you start typing in the search box that Gmail search will show you a list with search suggestions, also containing names of persons in your Gmail contact list.
As you go along and experiment with the search functionality in Gmail, you’ll quickly find that it does a great job in finding certain messages or conversations containing specific keywords, but in addition to that Gmail offers another great feature that will prove to be a tremendous help to keep your messages organized. It’s called ...
Gmail Labels
Most people won’t start playing around with labels any time shortly after they create a free Gmail account, which is too bad because Gmail labels are an amazingly helpful feature to keep your inbox organized.
If you have had any experience working with Microsoft Outlook, you could (sort of) compare Gmail labels with Outlook folders. One major difference with folders is that in Outlook, any particular message can only be in one folder at any given time. With Gmail folders, you can apply as many labels to a message as you want.
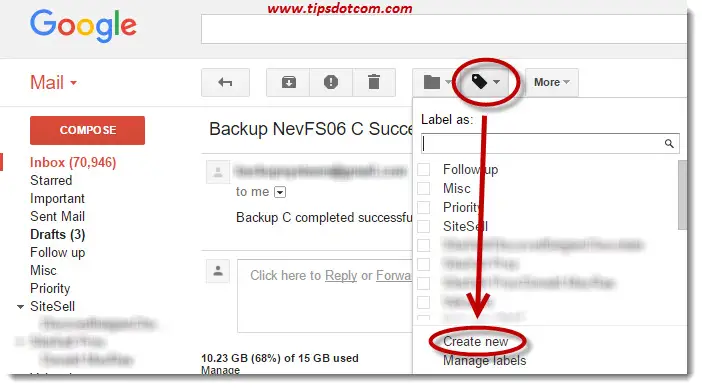
Suppose for instance that you would want to create a label for mail messages that your automated backup program sends you to keep you informed whether or not your backup has completed successfully.
To do so, click to open the particular message and then click the label icon above the message contents and select “Create new”.
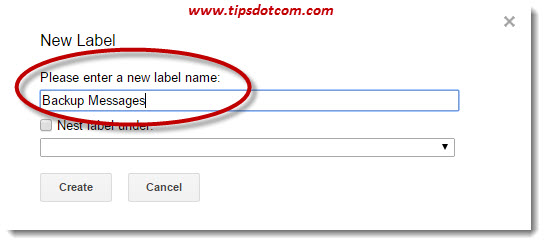
In the next screen, enter the name for your new label and click the create button. (Notice how you can even create nested labels, allowing you to work with sub-labels going several levels deep).
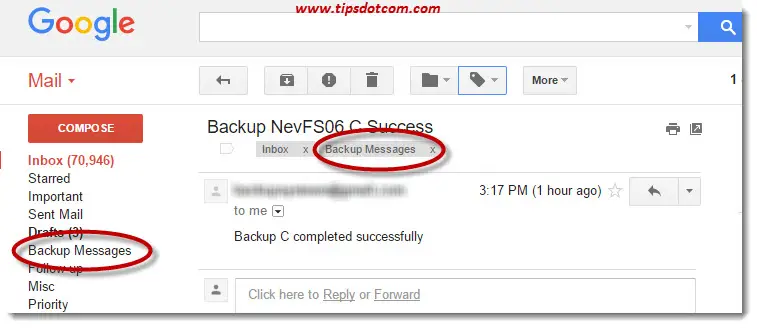
Gmail will now show the message with its according label name and on the left-hand side you’ll see the label heading where you can click to show all the messages with the corresponding label. Setting up labels might not be the first thing you do right after you create a free Gmail account, but don't underestimate how much it can help you to stay organized with e-mail messages.
You can even create a Gmail “Filter”, which will automatically filter out certain messages based upon a given keyword, sender or other conditions and let them automatically be labelled with any of your Gmail labels. (Keep reading for more on Gmail filters).
As I mentioned above, you can apply several different labels to any message. Suppose for instance that you would want to create another label called “System Messages” and you would want your backup messages to appear in this category as well, you could simply go ahead and create your “System Messages” label in the same way as the “Backup Messages” you just created.
Gmail Filters
Another feature most people won’t be using immediately after they create a free Gmail account but if you take a look at it you’ll quickly understand how this feature can dramatically simplify your e-mail experience.
In the example above I’ve explained how you can keep your messages organized by applying labels. Now you can take this one step further and let your Gmail system automatically apply labels to your messages as they arrive in your inbox. This is done through the use of Gmail filters. Continuing with the example above, let’s say you want to automatically apply the labels “Backup Messages” and “System Messages” to each message that originates from your backup software the moment it hits your inbox.
To do so, select the message you’d like to be labeled automatically in the future, click the “More” button in your Gmail screen and select “Filter messages like these”.
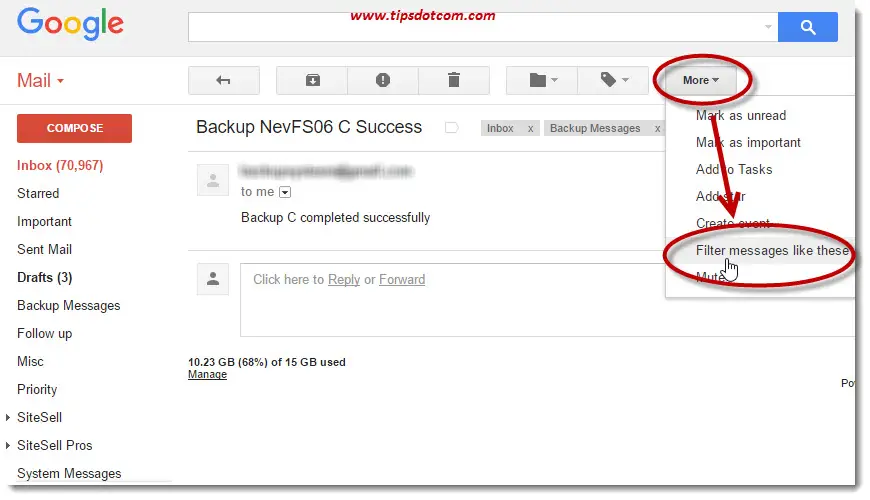
Google Mail will now display the “Create filter” screen, where it has already filled in the sender of the message (“from” field, blurred out in the image below), so any future messages of this sender will be processed the same way.
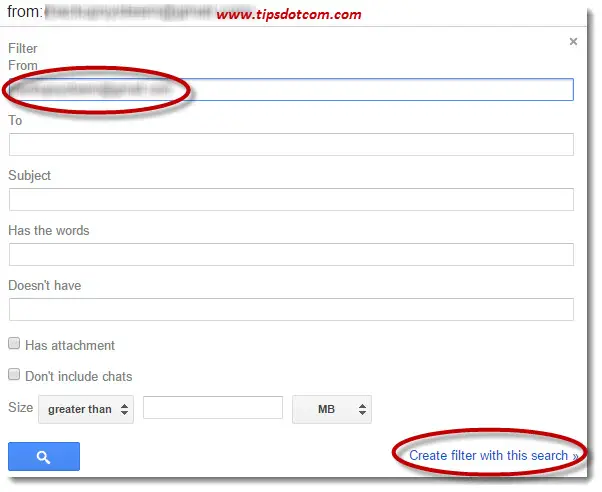
You can play with the other filter parameters if you want to create filters of any sophistication level and if you’re ready simply click “Create filter with this search”.
In the next screen you can see that I’ve selected the action “Apply the label: Backup Messages” for this filter.
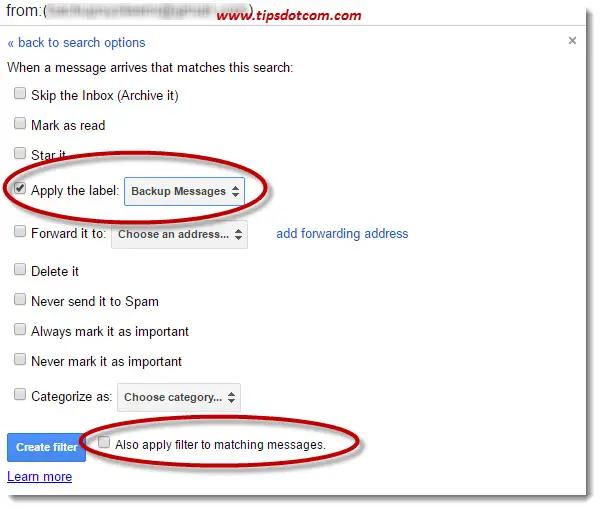
As you can see you have a whole range of other options at your disposal that you can use when automatically filtering messages. Also note the “Also apply filter to matching messages”, which will indeed filter any previously existing messages in your Gmail system and apply the “Backup Messages” label to them.
Click the “Create Filter” to activate the filter.
Now you can repeat the steps to apply any other label (for instance “System Messages”) for your messages.
Cc And Bcc
I think most people who create a free Gmail account already know about this, but it’s worth mentioning the difference between the “Cc” and “Bcc” when sending a message.
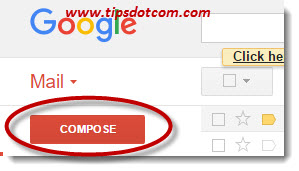
To go ahead and explain this, simply click the “Compose” button near the top left corner of your Gmail window.
Gmail will then open a new mail message window, where you’ll find a blinking cursor in the “To” field of your new e-mail message. This is where you put the address of your correspondent.
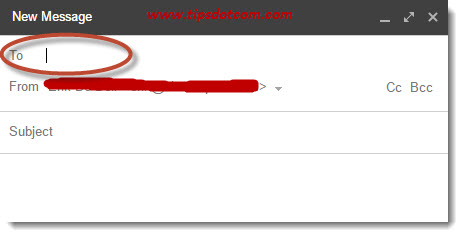
Gmail will automatically show you a list of matching names from your contacts list as your start typing, making it a lot easier for you to select your correspondent.
On the right-hand side of the above image, you’ll also see a “Cc” and “Bcc” link that you can click.
“Cc” stands for carbon copy, so anybody that you want to read your message but you don’t necessarily want them to be the direct recipient would be put in “Cc”.
“Bcc” (blind carbon copy) means that that person is going to receive the e-mail and no-one else is going to see that they’re getting it. What this is used for is when you want to send out a message to a group of people but you don’t want the other members of the group to see the other e-mail addresses because you want to respect their privacy. It’s just a nice way of sending a message to a group of people and respecting the privacy of whoever is getting the message.
Gmail Spam Filter
In this next section I do want to talk about the “Report Spam” button in Gmail. One of the reasons why many people create a free Gmail account is because of the awesome spam filtering capabilities of Gmail.
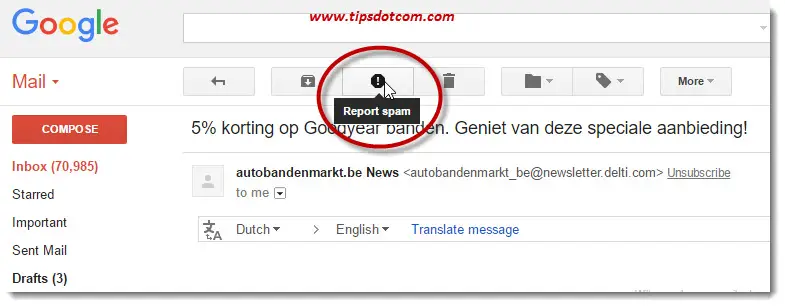
I think Google is doing a really good job in making sure that you don’t get spam. Chances are small that you will receive a lot of spam shortly after you create a free Gmail account. Whenever you do get spam you can go ahead and click on the “Report spam” button. What that will do is delete the message from your inbox, it is going to block that sender from ever sending another message into your inbox and finally it’s also going to report that sender to Gmail. This will let them know that this is someone who is spamming. So if they get multiple users reporting on this same e-mail address it will strengthen the system for everyone.
To check your messages that Gmail has automatically labeled as spam, simply click the spam label on the left-hand side of your screen.
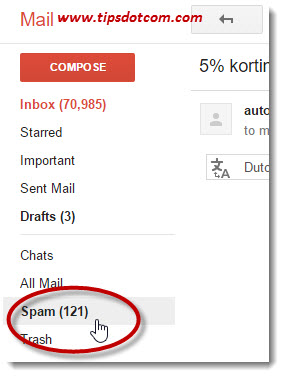
You will then see that Gmail is very much doing its job (as noted before: shortly after you create a free Gmail account there probably won't be any spam at all) but the reason why Gmail shows you these spam messages is because sometimes, a message might get accidently labeled as spam.
Whenever you find a message labeled as spam that you DO want to receive, you can click the “Not spam” button.

From that moment on, that sender would be lifted off of your spam list.
Gmail Conversation View
Gmail will show your e-mail conversations in “Conversation view” by default. That means that right after you create a free Gmail account, your inbox will be organized in conversation view. Conversation view keeps all messages that belong to one conversation (one original message and all replies to that original message) together in one entry in your inbox.
If you prefer to have your messages displayed in the old way, where each message came through individually, you can change this behavior by clicking on the gear icon near the top right corner and going to “settings”.
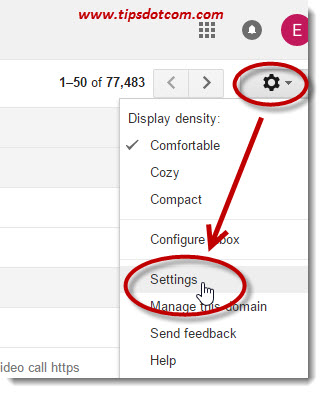
In your settings, look for the option to set “conversation view off”.

Make sure that whenever you adjust any of your settings you always scroll down all the way to the very bottom of the screen and click on “Save changes”.

Conclusion
With this article I tried to explain how to create a free Gmail account and how to get started with some of the settings in order to organize your e-mail experience.
If you've enjoyed this article or found it useful, I'd appreciate it if you'd let me know by clicking the Like (or Share) button below. Thank you!


New! Comments
Have your say about what you just read! Leave me a comment in the box below.