Share OneDrive Files With External Users
You can now easily share OneDrive files with external users, even if the person doesn’t have OneDrive. This method has a number of advantages over sending a file or files as email attachments and you’ll agree that it’s a total game-changer once you get the hang of it, I promise.
Sharing files via OneDrive may require you to slightly adapt at first, but it’s actually so much easier and causes less problems than sending files via email. You don’t have to worry that your file will be too big to get through and you can even set expiration dates so that your correspondent can only access your file for a given amount of time (although this is a premium feature). You can even prohibit your correspondent from forwarding your file to someone else.
Having more options available may sound complicated if all you need to do is send a file from A to B, but even if that is all you want to do you’ll see that OneDrive can also get the job done with just 2 clicks of the mouse.
While you can work in the online version of OneDrive in your browser, this guide is focused on the desktop version of OneDrive. Online counterparts of the actions described here are similar but may vary slightly.
How to Share OneDrive Files With External Users
To share OneDrive files with external users, right click the file, select OneDrive from the menu and then select “Share”. Now enter the email address(es) of the person(s) you want to share your file with and click send.
It doesn’t get much easier than that, does it? This is the most basic way to share OneDrive files with external users. Before I forget, some people report that they get an error message that at least one recipient isn’t valid when trying to share a file in OneDrive. You can click the link to find out how to deal with that.
If you want to get fancy with more bells and whistles, you may have to select an extra option here and there. So let’s see in a little more detail how this works. In what follows I’ll repeat the same steps as described above but this time I’ll add the screenshots. I’ll also cover some more advanced features besides simply sharing a file with the default options to help you understand the possibilities of sharing Onedrive files with someone else.
In the image below you can see that I have a file called “shared-onedrive-file.txt” in my OneDrive and that its status is synced. By the way, you can check out my article about OneDrive status symbols if you’re curious.
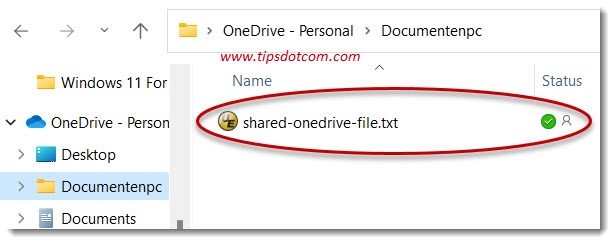
So now if I want to share this file, I’m going to right click on it and select OneDrive and then “Share”.

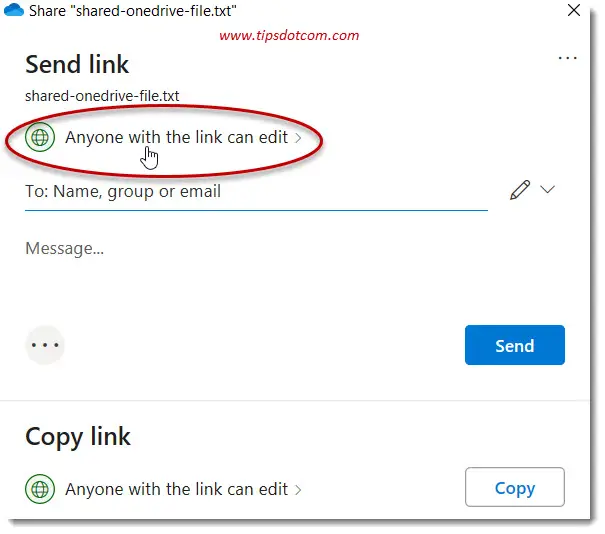
This will bring up the dialog box where you can share OneDrive files with external users.

As you can see in the image above, you can enter the email addresses of one or more recipients in the field that says “To: name, group or email” and click send to send out your file. But let’s go over some of the options first.
One of the first things to notice is the text that “Anyone with the link can edit”. This means that anyone who has the direct link to your file will be able to edit the file. They will need a Microsoft account to be able to do this, but assuming that they have a Microsoft account, people can actually make changes to the file in your OneDrive if you leave this option set like that.
This is worth elaborating on.
What we have just seen above means that if you share OneDrive files with external users with the default options, anyone with the link to your file can actually edit your file in your OneDrive.
As scary as that sounds, there’s no reason to panic. That’s because:
- If you share OneDrive files with external users, OneDrive will generate long randomly created links so the risk of anyone guessing the link to your shared file is practically nil.
- This creates an opportunity for collaboration in files without having to email versions back and forth. When sending file versions back and forth people typically get confused quickly as to which version is the latest one to work on. Especially if you’re collaborating with more than two people on the same file.
- You can always change the permissions when sharing files in OneDrive so that the person you’re sharing the file with cannot make any changes (read only).
Before we get into revoking privileges, let’s first continue our example and leave the default setting of “Everyone with the link can edit”. So let’s see how that works.
In order to share this OneDrive file with someone else, type the email address of the person you want to share the file with, optionally enter a personal message and click the send button (this is basically the same action as described earlier, but please bear with me).
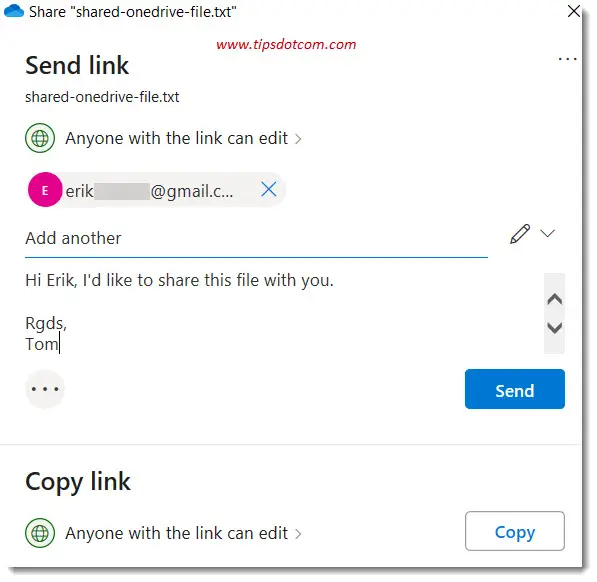
We’ve now just sent a file sharing invitation with the option that anyone with the link can edit. I’ll also show you where you can see what that link looks like in a minute. The person on the receiving end of the invitation will get an email that will allow them to access your file.
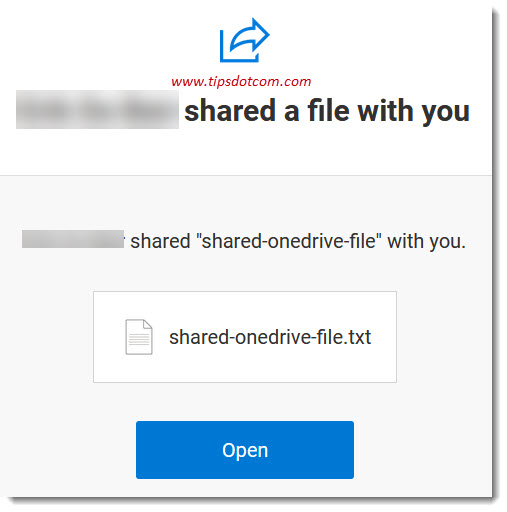
The recipient of your shared file can now simply click the “Open” button to view your file. They don’t even need to have OneDrive to be able to access your file. In this example we’ve left the option that “Anyone with the link can make changes”, but in order for them to make any changes they do need a Microsoft OneDrive account.
Your correspondent can also forward the email with the link to your file to anyone else and they will also be able to view your file and make changes if they have OneDrive.
If you don’t like the idea that anyone can make changes to your file, we need to set the privileges a little more restrictive. Remember that if you share OneDrive files with external users, this is different from sending them a file as an email attachment.
If you are sharing a OneDrive file, you’re actually sending someone a link to a file that sits in your OneDrive folder. If anyone makes a change in the file, next time you open your file, the changes will be visible in your file.
So now let’s take a look at how you can change the permissions so that only people you specify can make changes.
Can I Revoke Editing Permissions from a Shared OneDrive File?
If you’ve accidentally shared OneDrive files with privileges that anyone with the link can edit, you can revoke these privileges. To do so, right click your OneDrive file, select OneDrive and click “Share”. Then click the three dots in the top right corner and select “Manage access”.
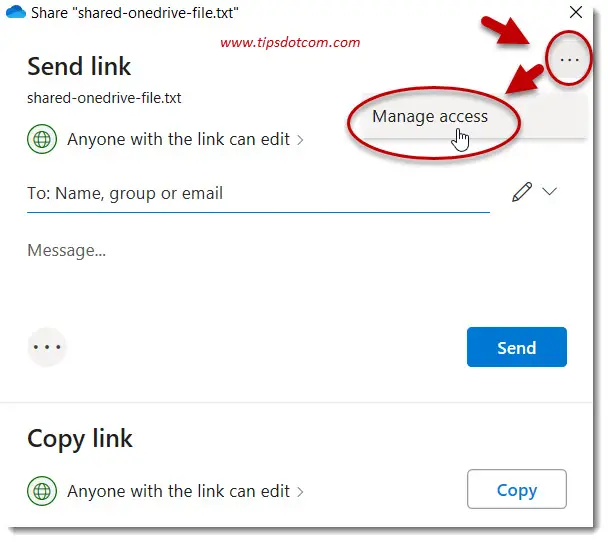
Now you can click the downward arrow next to the person you sent the share invitation to and select “Stop sharing”.
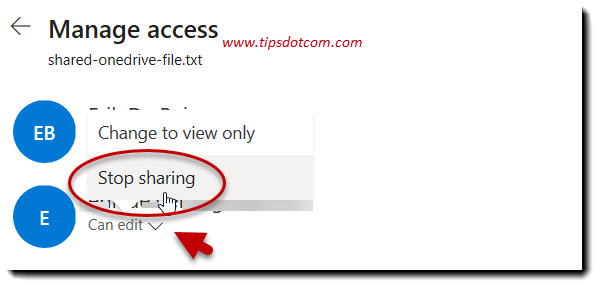
You have now effectively revoked your share for which anyone with the link can edit, but this means that even the person you had originally sent the invitation to now can also no longer access your file. The link will simply not work anymore.
If you want to share your OneDrive files with this person and NOT with everyone else, you’ll need to create a new sharing link with more restrictive privileges.
Let’s see how that goes.
To share a OneDrive file with specific people only, right click the OneDrive file you want to share, select “OneDrive” and then click “Share”. This will bring up the “Send link” dialog box again.
Now make sure to click the text “Anyone with the link can edit”.
OneDrive will now display this link settings screen, where you can select the option “Specific people”. Select this option and click apply to continue.
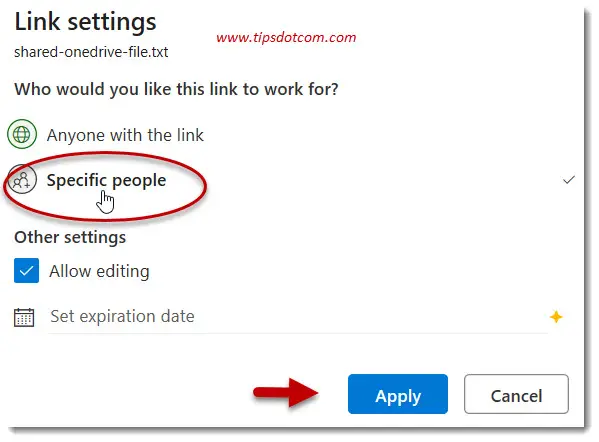
As you can see in the image above, you can also use the checkbox next to the option to “Allow editing” to change whether your correspondent will only be able to view the file or make changes as well.
After you click apply, you will come back to the “Send link” dialog box, where you can enter the email address of the person you want to share your OneDrive file with and click the send button. This time, you have sent a sharing invitation which can only be used by the person(s) you specified.
The Following Emails Are Not Microsoft Accounts
If you get the message that “The following emails are not Microsoft accounts”, you are trying to share OneDrive files with external users that don’t have a Microsoft account. To be able to share OneDrive files with someone who doesn’t have a Microsoft account, you need to use the option that “Anyone with the link can edit”. Alternatively, a OneDrive premium account will also allow you to share OneDrive files with someone who doesn’t have a Microsoft account.
Let’s see how that works.
Can I Share OneDrive Files With External Users Who Don’t Have a Microsoft Account?
To share OneDrive files with someone who doesn’t have a Microsoft account you must either use the option that “Anyone with the link can edit” the file or you must have a premium OneDrive subscription.
If you have a premium account, you can share your file with someone who doesn’t have a Microsoft account. But that person will need to identify him or herself if you’re only sharing with specific people.
The person who receives your sharing invitation will then also receive an email, similar to what we saw before.
Now the invitation will specifically mention that “This link only works for the direct recipients of this message”.
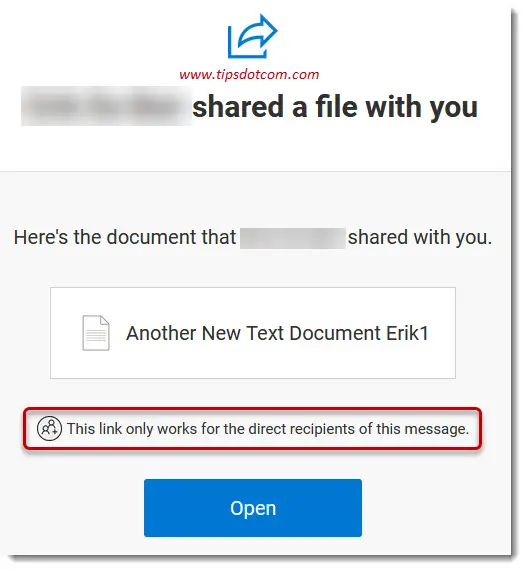
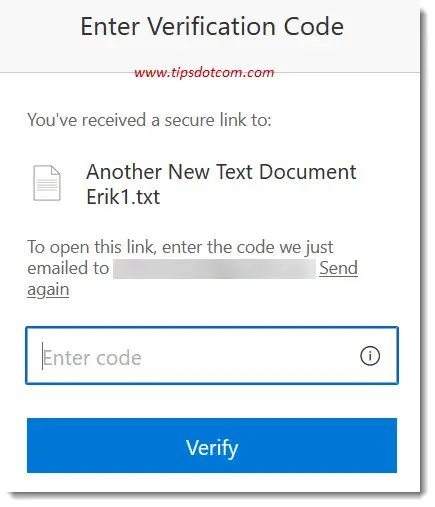
So how does the identification mechanism work? When your recipient clicks the button to open your file, they will now see a screen where they can request a verification code to be sent to their email address.
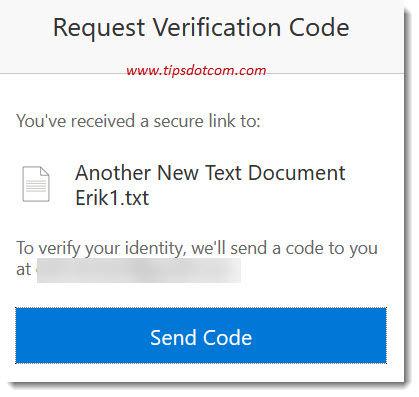
When they click the “Send code” button they will receive an email with their personal verification code, which they will then have to enter in the next screen in order to access your file.
Share OneDrive Files With External Users For Collaboration
With all this being said it should become clear that sharing OneDrive files with someone makes collaboration easier than sending files back and forth between parties via email. Depending on the number of involved parties and versions of the file that start circulating via emails, things can become pretty confusing. It’s hard to keep track of who has the version with the latest changes.
Sharing files in OneDrive effectively deals with that. You keep the file in one place and send out sharing invitations to anyone who is involved. That way, the latest and correct version is always available and updated on the spot.
In contrast with files that have been sent out as an email attachment, with OneDrive shared files you can always revoke privileges as needed and you can avoid people forwarding copies of your files as the links will simply not work for anyone who fails to identify themselves as someone who can access your file.
Are you beginning to see why it’s so powerful to share OneDrive files with external users versus sending a file as an email attachment? Your file remains under your control at all times and you don’t even have to worry about extra copies that could start circulating. You can even set an expiration date so that your file will no longer be shared after a certain period of time, even if you forget about it.
It’s worth noting though that sharing files with an expiration date is a premium feature for which you need a paid subscription. Let’s quickly see how it looks in action.
Share OneDrive Files With an Expiration Limit
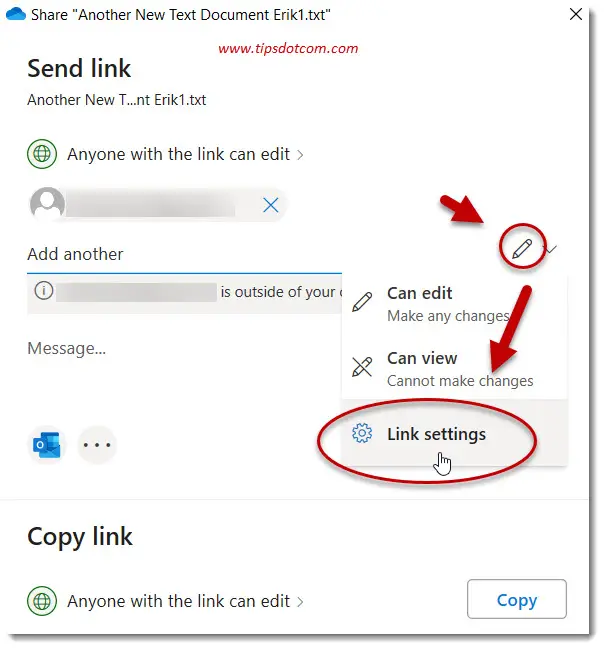
To share OneDrive files with external users and set an expiration date, enter the user’s email address like you would do for “normal” sharing and then click the pencil icon on the right and select “Link settings”.
Now you can click the “Set expiration date” field and set the expiration for your link. After that date, the link will automatically no longer work. Set and forget.
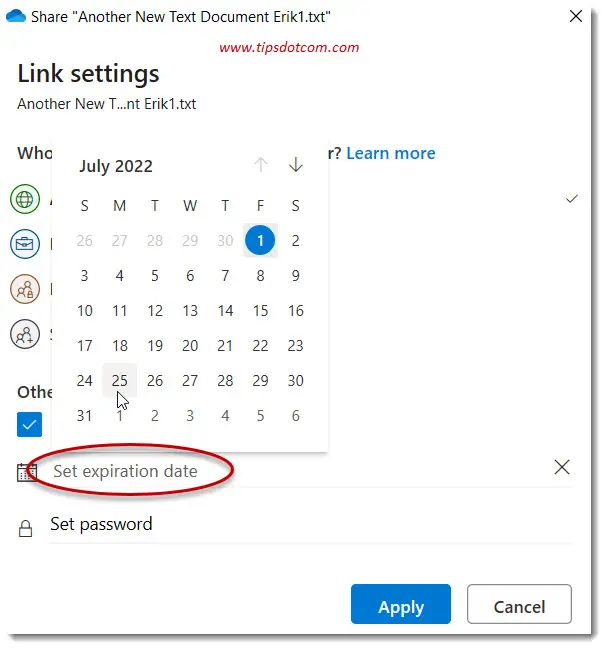
As you can see in the image above, there’s also a “Set password” option which allows you to set an extra password for extra security. This is also a premium feature, which is not available with a free OneDrive account.
Even with only the options that are available with a free OneDrive account, sharing files with others gives you more control over what happens with your files vs sending email attachments.
If you've enjoyed this article or found it useful, I'd appreciate it if you'd let me know by clicking the Like (or Share) button below. Thank you!


New! Comments
Have your say about what you just read! Leave me a comment in the box below.