Windows 10 Show Desktop Icon
In this quick tutorial I’ll show you how to create a Windows 10 show desktop icon. My previous article on how to do this dates from the pre-Windows 10 era, so I decided to polish up the instructions, create new screenshots to illustrate the process and deliver an up-to-date guide for your Windows 10 operating system.
Just to make sure that we are on the same page about what the show desktop icon actually is, it’s the little icon that sits on the Windows taskbar, usually not far from the start button, that allows you to go directly to your desktop with one single click. No matter how many windows you have open, one click on the show desktop button will minimize them all and take you immediately to your desktop.
Up until Windows XP, the show desktop icon would always be there, unless you had deliberately removed it.
Not so with Windows 10 (as a matter of fact, neither with Windows 7 or 8)
Create Your Own Windows 10 Show Desktop Icon
Before we get started, allow me to point out that there are a few other shortcuts to showing the desktop besides the Windows 10 show desktop icon. You may or may not know about these, but many people switch to one of these alternative methods once they know about it and then quickly forget the show desktop icon altogether. Additional advantage being that the space in their taskbar can be used for other, more useful shortcuts.
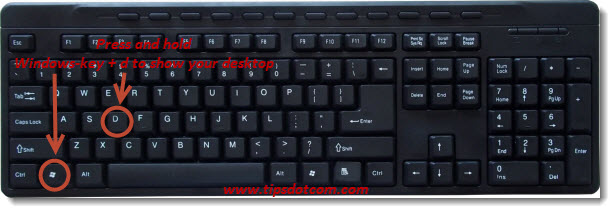
The first alternative for the show desktop icon that I would like to bring to your attention is the keyboard combination Windows key + d.

This keyboard combination will toggle between your desktop and your active window.
If you prefer to have something to click on rather than using a keyboard combination, you can also use the small vertical square all the way on the right on your taskbar.
If you click there, you will also go directly to your desktop.
Then, there is of course the method of using your right mouse button on an empty spot on your taskbar and selecting “Show the desktop”. That will obviously also take you straight away to your desktop, but it requires two clicks rather than one. Insignificant as this may seem, this might indeed lower your general perception of working speed on your computer.
Create Your Own Show Desktop Icon – Part b)
Ok, with that out of the way, let’s walk you through the steps of creating an authentic, fully functional show desktop icon.
Again, there are a few different methods that you can use to accomplish this.
Method 1
The first method would be to download this small file that I have prepared here for you (simply click on the link).
Your browser will show a message similar to this:
Click save to continue. The image just above is Internet Explorer 11 on Windows 10. If you’re using Microsoft Edge, you might see a message that the download has completed, prompting you to open the file. You should then indeed open the file to proceed. If you’re using yet another browser, prompts may be a little different.
The point is to save the file on your local hard drive and open the folder where you saved it. Don’t worry if all this is too confusing for you, you can always use the second method to create your Windows 10 show desktop icon.
Continuing with the Internet Explorer 11 screenshot from above, this would be the notification you would see when your download is ready.
The “Open folder” button will take you directly to the downloaded file.
Next, right-click on the file and select “Extract all”.
Make sure the checkbox next to “Show extracted files when complete” is selected and click the extract button.
Now you will get a new window with your show desktop icon ready. You can now drag and drop this icon directly between your existing icons on your taskbar.
Or you can right-click the icon and select “Pin to taskbar”.
Once the Windows 10 show desktop icon is sitting on your taskbar, you can click and drag it to move it to another location if you want.
You can now use this icon to show your desktop no matter how many windows you have open.
Method 2:
Right-click on an empty spot on your desktop and select “New” and then “Shortcut”.
In the next screen, type (or copy/paste) the following line of text:
%windir%\explorer.exe shell:::{3080F90D-D7AD-11D9-BD98-0000947B0257}
and click next.
In the “Type a name for this shortcut” field, type “Show Desktop” (without the quotes) and click finish.
A new show desktop icon will appear on your desktop. Click it with your right mouse button and select properties.
In the properties window of your shortcut, click the “Change icon” button.
Pick a suitable icon for your new show desktop icon and click ok. In the properties window, click ok once again.
Now you’ll have a new show desktop icon on your desktop. Right-click your new icon and select “Pin to taskbar”.
Your new icon will appear on your taskbar, ready to be used. You can drag and drop it to rearrange the order of your icons in your taskbar.
I hope this tutorial has helped you in creating your own Windows 10 show desktop icon. Feel free to let me know in the commenting section below if it did :-)
Related article: Create a show desktop icon in previous Windows versions.
If you've enjoyed this article or found it useful, I'd appreciate it if you'd let me know by clicking the Like (or Share) button below. Thank you!


New! Comments
Have your say about what you just read! Leave me a comment in the box below.