Windows 8 Taskbar – Essential Underused Tips
Does your Windows 8 taskbar still look like anyone else’s? It’s one of the most customizable elements in Windows 8, yet most users accept it as it is and never bother to change any of its behaviors. Nevertheless, getting to know the features of the taskbar only takes a couple of minutes and will allow you to control your computer like a pro for many years to come.
In addition to that, if you know a few things about the Windows 8 taskbar, you can easily take place in front of anyone else’s computer and don’t look stupid, even if that person if one of the five individuals on the planet who has customized the taskbar.
Windows 8 Modern Interface vs Desktop
Has your taskbar disappeared? One of the things you must know if you think that your taskbar disappeared in Windows 8 is that Windows 8 can run in 2 “modes”. You have the “Modern User Interface” mode (MUI, or previously called “Metro”) and you have “Desktop Mode”. You won’t find any taskbars in the Modern User Interface. That’s by design. You will find many “taskbar disappeared Windows 8” cries for help on the internet, mainly by people who find themselves a bit lost amidst the large application tiles in the Windows 8 MUI.
Just for illustration purposes, here’s what the Windows 8 MUI looks like:
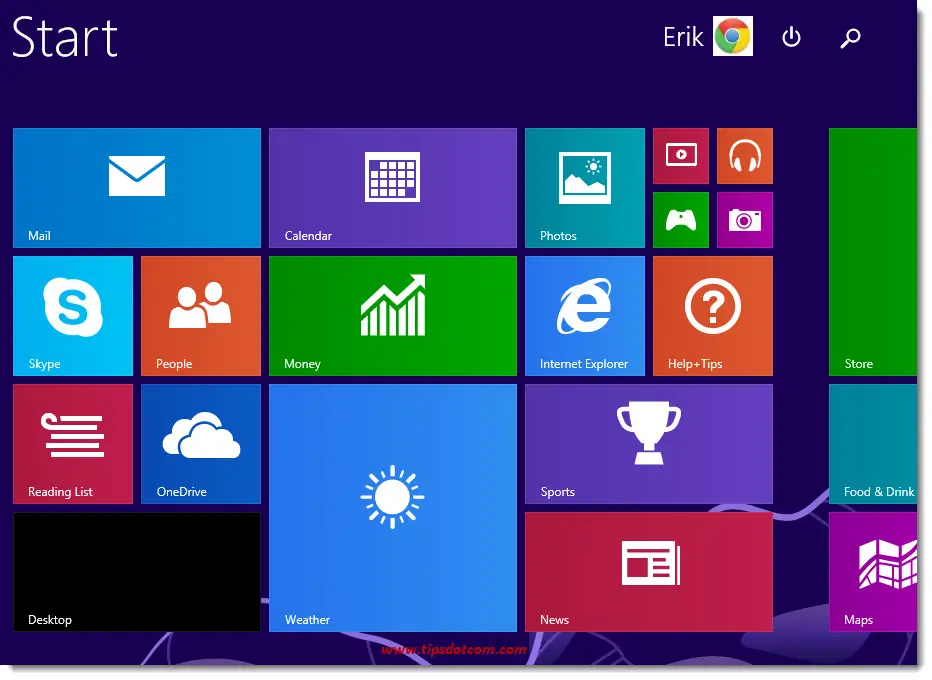
The Windows 8 MUI looks quite different from the desktop interfaces that we have been used to until Windows 7, but Windows 8 still offers the possibility to operate in Desktop mode. As a matter of fact, many people who are working with Windows 8 on a non-mobile device prefer Desktop mode as this feels more familiar to them and offers more possibilities.
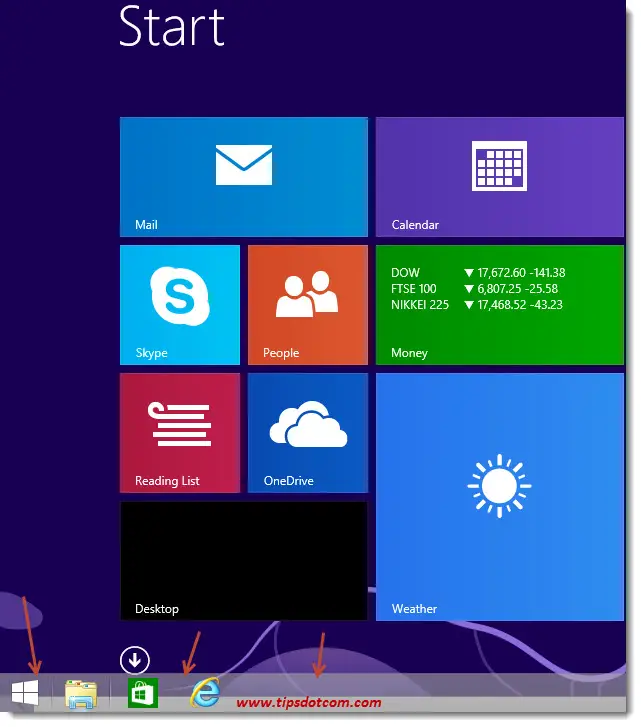
As you can see in the MUI image above, there is no taskbar in the Windows 8 start screen, nor will there appear one if you move your mouse pointer to the bottom of the screen. What you can do in the Windows 8 start screen to show the taskbar is press the Windows-key + T combination on your keyboard.
As you can see in the image below, pressing the Windows-key + T keyboard combination will show the taskbar. If you click on any of the application images in the taskbar, the application will open in Desktop mode.
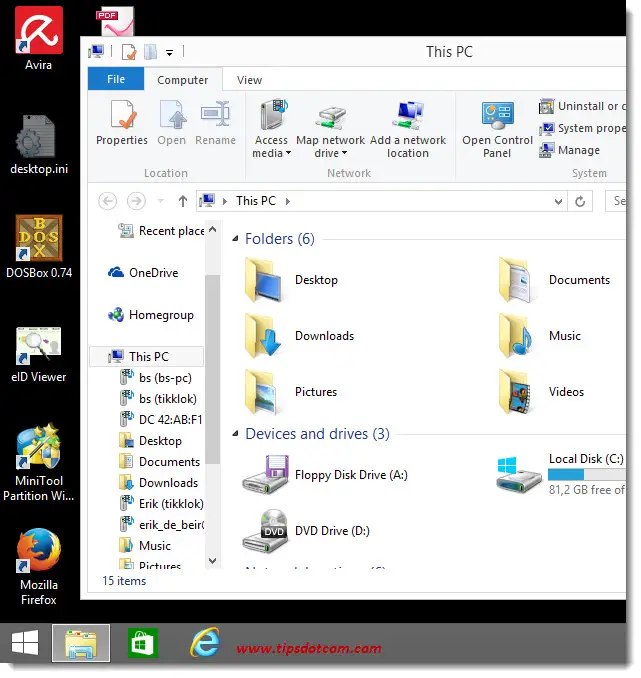
This next image shows how Windows Explorer opened in desktop mode, with the “This PC” Window , application icons on the desktop and the Windows 8 taskbar at the bottom of the screen.
Another way of getting to the desktop from within the Windows 8 MUI is by simply clicking the desktop tile. If you go back and take another look at the first image in this article, you’ll notice a large, black tile with “Desktop” written in the bottom left corner. In your own Windows 8 MUI start screen, you’ll have a similar desktop tile, although it may look different depending on your desktop wallpaper. Clicking your desktop tile will also take you to your desktop, where you’ll have the Windows 8 taskbar.
Customizing Your Windows 8 Taskbar
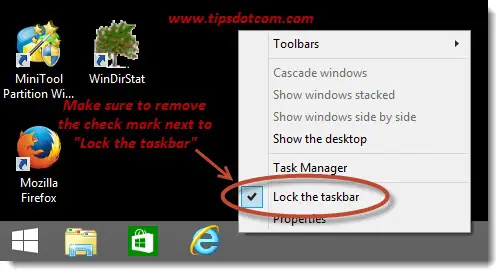
Before you can start customizing your taskbar, you need to make sure that the taskbar is unlocked. You unlock the Windows 8 taskbar by right-clicking an empty spot on the taskbar and de-selecting the checkmark next to “Lock the taskbar”.
Tip 1 – Windows 8 Quick Launch
Ever since the introduction of Windows 8, people have been wondering “where is the Windows 8 Quick Launch” toolbar?
In Windows 7 and earlier versions, this used to be an option that could be activated in the taskbar properties settings, but in Windows 8 this is slightly more complicated.
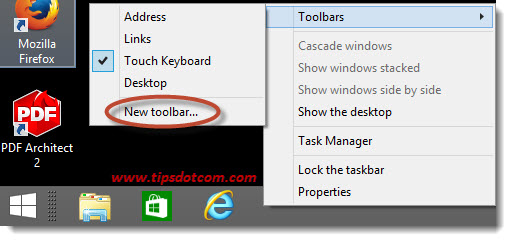
Right-click an empty spot on your taskbar and select “Toolbars...” and then “New Toolbar.
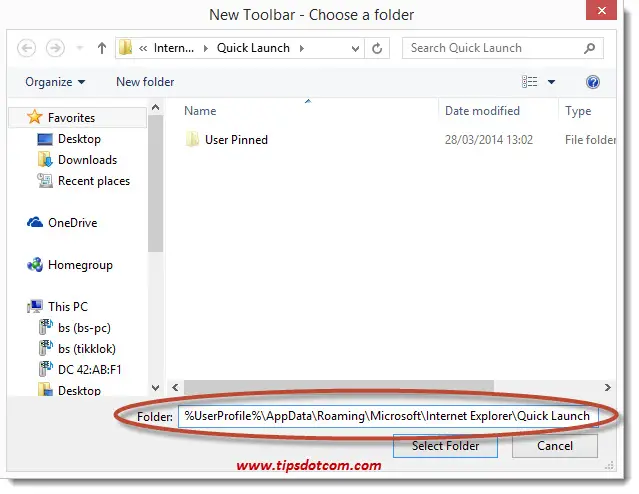
Then, in the “Folder” field, copy and paste the next line of text:
%UserProfile%\AppData\Roaming\Microsoft\Internet Explorer\Quick Launch
and click “Select folder”
You will then have the Windows 8 Quick Launch toolbar, which might require some fine-tuning.

First of all, right-click the Windows 8 Quick Launch Toolbar and DE-select “Show text” and “Show title” to make it look a little more recognizable.
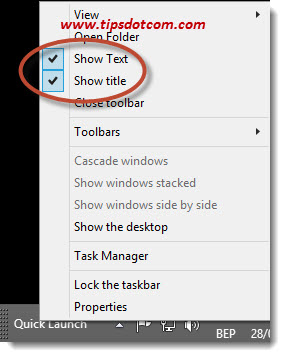
This is what the Windows 8 Quick Launch toolbar will look like with "Show Text" and "Show Title" disabled:

If you want to move the Quick Launch toolbar more to the left on your taskbar, move your mouse pointer over the dotted line on the Quick Launch toolbar, click and drag all the way to the left of the dotted line on the left on the taskbar.

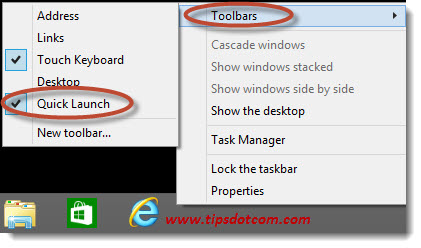
To remove the Windows 8 Quick Launch toolbar again, right-click an empty spot on your taskbar, select “Toolbars” and then deselect “Quick launch”.
Tip 2 – Moving Your Taskbar
As long as your taskbar is still unlocked, you can start customizing its appearance and features. For instance, you can move your taskbar to another location on your screen instead of at the bottom. To do that, simply click and hold the taskbar on an empty spot and drag the taskbar to one of the other edges of your screen.
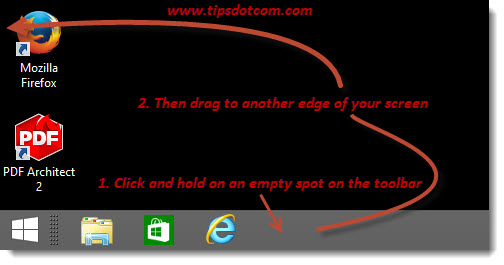
The result will be that your toolbar now sits on the edge of your screen where you moved it. In the image below is an example of a vertically oriented toolbar at the left side of the screen. Once you know how this works, it’s very easy to help someone whose toolbar accidently got moved to another side of the screen.
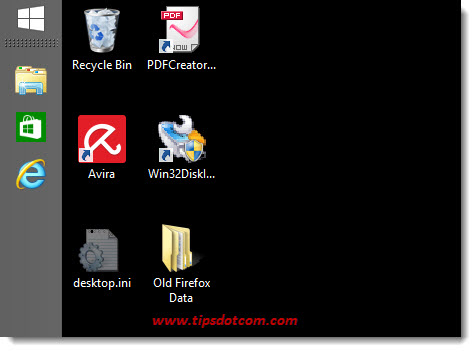
You’d be surprised how many times people get stuck because their toolbar suddenly moves to another part of the screen and they don’t know how to fix this.
Tip 3 – Auto Hiding Your Taskbar
Another cry for help that you’ll hear every now and then is from people whose Windows 8 taskbar disappeared. The disappearing or auto-hide behavior of the taskbar is another feature that can sometimes cause confusion with new computer users. Some people enable the taskbar auto-hide feature so that the taskbar disappears while they are working in an application, making more screen real estate available to work with.
You enable the Windows 8 taskbar auto-hide feature by right-clicking on an empty spot on the taskbar, selecting “properties” and selecting the “auto-hide” checkbox in the “Taskbar and navigation properties” screen.
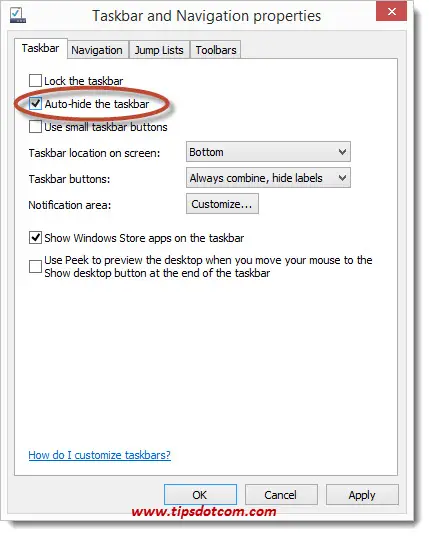
In this screen, you’ll also notice the “Taskbar location on screen” feature with a drop-down list, which is an alternative to the method described above if you want to move your taskbar to another location.
With the taskbar auto-hide feature enabled, simply move your mouse all the way down to the bottom of your screen whenever you need your taskbar. Just give it a try and you’ll see how your taskbar automatically appears whenever you need it.
Tip 4 – Using Small Icons
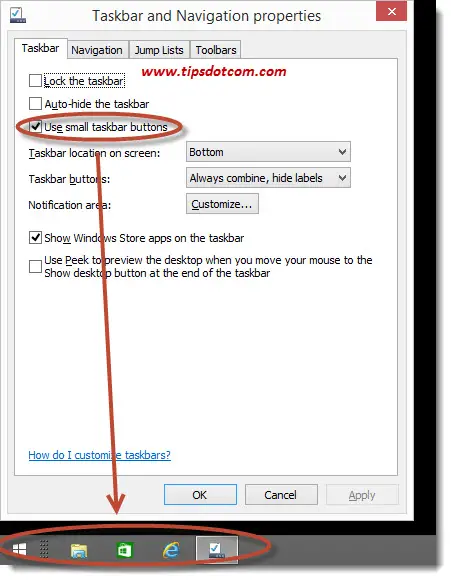
If you don’t have enough space on your taskbar to display all the application buttons of your open programs, you can enable the feature “Use small taskbar buttons” in the “Taskbar and navigation properties” screen and click the apply button to see the results immediately.
Tip 5 – Remove The Windows Store App From The Windows 8 Taskbar
If you’ve ever tried to unpin the Windows Store app from your taskbar, you have probably noticed that you couldn’t get rid of the Windows Store app so easily. Here’s how to remove the Windows Store app from your taskbar.
In the “Taskbar and navigation properties” screen, uncheck the box next to “Show Windows Store apps on the taskbar” and click ok.
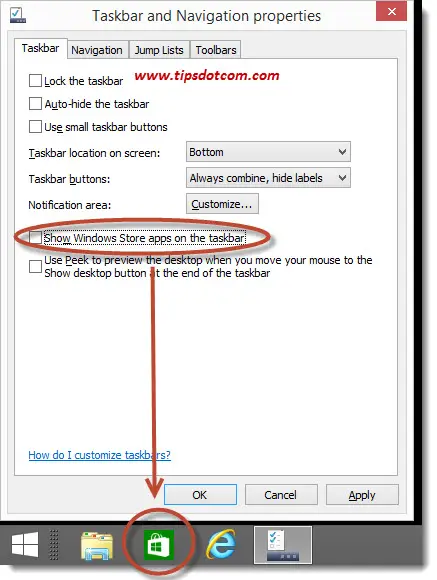
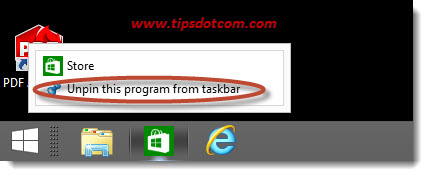
You might be surprised to still see the Windows Store icon on your taskbar after this step, but getting rid of the Windows Store icon on your taskbar requires one more action: right-click the icon and select “Unpin this program from taskbar”.
Tip 6 – Manage Taskbar Space By Grouping Application Buttons
By default, Windows groups together the instances of application buttons if you have the same application open several times. For instance, if you have two or more Windows Explorer windows open, they will appear grouped together on the taskbar (see first image below), but if you use the “Taskbar buttons” dropdown list options, you can make the buttons appear next to each other, like in the second image below.
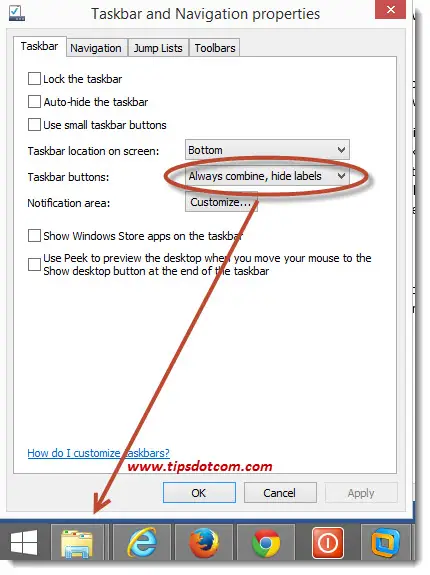
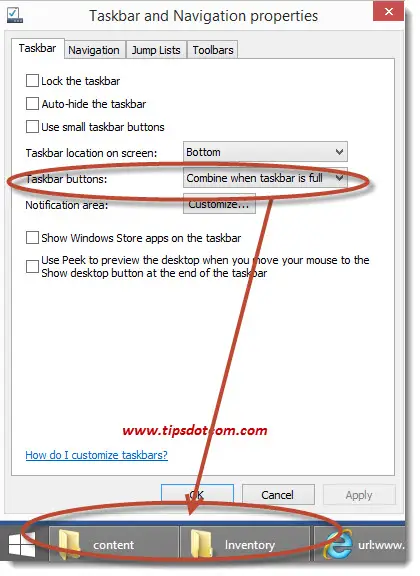
Some people prefer to set this option to “Combine when taskbar is full”, because application buttons also show a label with this setting As long as Windows has enough room on the taskbar to arrange the application buttons separately, that is). As you can see in the Windows Explorer buttons in the image above, the buttons also show the name of the current folder.
Tip 7 – Customizing The Notification Area
The notification area (also sometimes called system tray) on the Windows 8 taskbar on the right-hand side where the date and time are displayed, can also be customized.
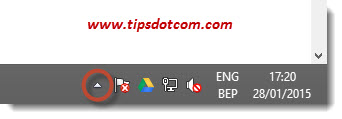
Windows displays a small, upward pointing triangle in the notification area (circled in red in the image above) that you can click to show hidden icons. Some other icons are not hidden and are always visible on your taskbar. Certain programs will create an icon in your notification area when you install on your computer, like for instance the yellow-green-blue Google Drive icon in the image above.
If you are not happy with the icons that are visible or not, you can customize them by clicking the triangle and then clicking “customize”.
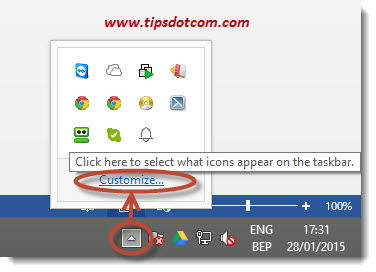
The notification area icons window will appear, where you can choose for each icon whether to
- Show icon and notifications
- Hide icon and notifications
- Only show notifications
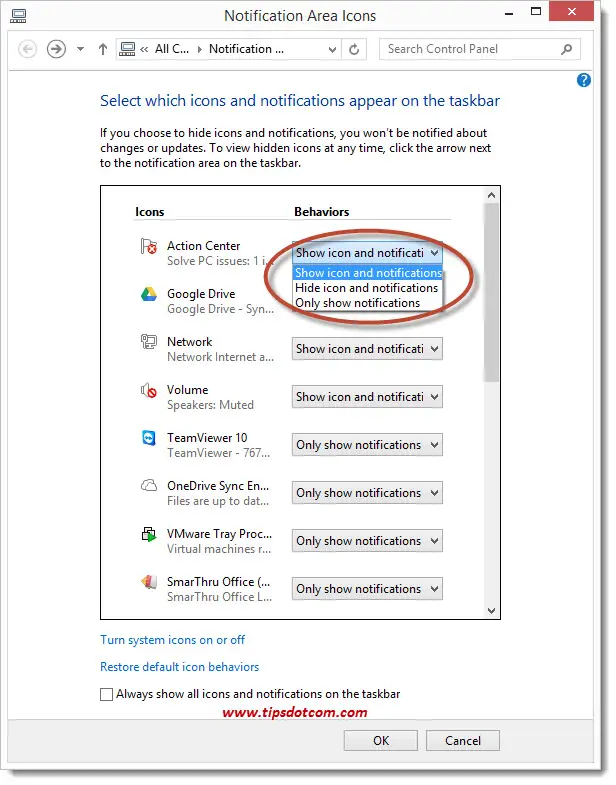
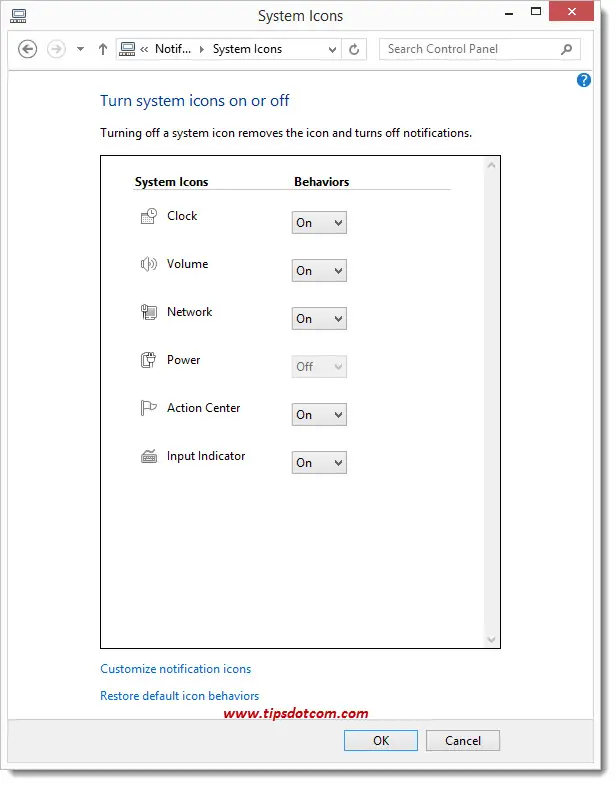
Also note the blue link that says “Turn system icons on or off”, which will take you to the system icons screen, where you get to decide whether or not to show each individual system icon.
Tip 8 – Adding The Address Toolbar
Some people like to add the address toolbar to their Windows 8 taskbar.

Having the address toolbar in your taskbar can be a quick way to go to certain web addresses with a single click of the mouse, no matter what application windows you have open. You simply click in the address bar, type the address and press ENTER to open up the page with your default internet browser.
To put the address (or another) toolbar on your taskbar, right-click an empty spot on your taskbar, select properties and in the “Taskbar and navigation properties” window, check address on the “Toolbars” tab.
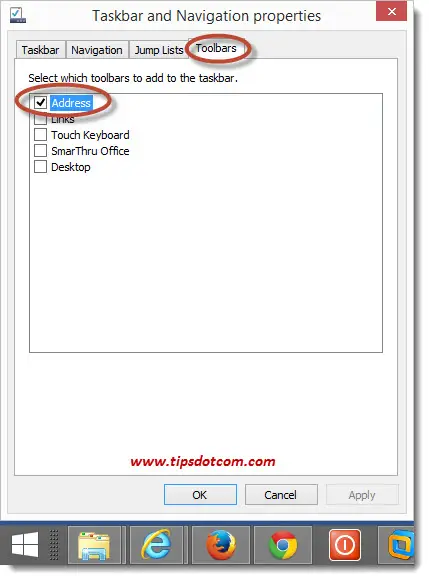
Feel free to experiment with other toolbars as well, you can always remove them again later if you don’t want them there.
Tip 8 – Enlarging The Taskbar
With all the extra icons in the notification area, extra toolbars and un-combined application buttons, you might quickly find that you run out of space on your taskbar. You can enlarge the taskbar by moving your mouse to the top of your Windows 8 taskbar until the mouse pointer changes into a two-sided arrow.
Then simply drag upwards to enlarge the taskbar.

If you've enjoyed this article or found it useful, I'd appreciate it if you'd let me know by clicking the Like (or Share) button below. Thank you!


New! Comments
Have your say about what you just read! Leave me a comment in the box below.