Working With Windows Jump Lists
Understanding Windows jump lists is not exactly going to earn you epic bragging rights. They are easy to work with, they don’t require any mysterious maintenance wizardry and they sure as heck don’t need complex configuration settings in order to work. They even build themselves up automatically.
Yet they are worth a closer look because many people still don’t know what they exactly are and they do put the power at your fingertips to get things done so much quicker once you start using them.
Windows Jump Lists - Hidden Secret Feature?
Ok so Windows jump lists have always mattered in the past and there is no good reason why they shouldn’t continue to matter today. But where can you find them? And is it advantageous to start using them?
You’ll start noticing and appreciating them once you begin right-clicking the icons on your taskbar. There is no one-size-fits-all explanation for Windows jump lists because they behave differently depending on the program or application you are looking at, but the general idea is always the same. Jump lists keep track of the things you’ve been working on and they automatically organize your stuff in such a way that you can find everything back instantaneously. In fact, they work pretty much similar to Windows quick access in file explorer.
Let’s take a look at an example to illustrate this. The image below shows my Windows 10 taskbar with a number of program icons, including a Microsoft Excel icon. (If you’re not sure how to pin program icons to your taskbar, feel free to check out my article on pinning programs to your taskbar.)
 The pinned Microsoft Excel icon on my taskbar
To bring out my Windows 10 jump lists for Microsoft Excel, I simply right-click the Excel icon on my taskbar. Windows displays my jump list, which is populated with the most recent documents I last worked with.
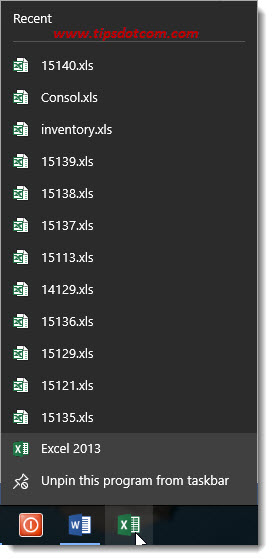 Right-clicking the icon brings out recent documents
Now I can easily and quickly pick any of these recent documents and Microsoft Excel will automatically open with the selected document, ready to continue working.
Trivial as this may seem, this approach certainly beats having to open Excel first, then navigate the Excel menu to open a document and then browsing through your document folders in order to select the right document.
What About Windows 7 or 8? Or Other Programs?
You’ll find Windows 7 jump lists and Windows 8 jump lists as well; Windows 10 is not the first incarnation of Microsoft’s operating system where this is implemented. Bottom line? This is easily one of the most overlooked features in many computer tips and tricks publications. You just have to remember to right-click icons on your task bar.
What’s more, depending on the program, you’ll find slightly different Windows jump lists with specific time-saving selections for that particular application. The image below shows my jump list for Mozilla Firefox, with shortcuts to my recent web-activities so I can launch Firefox and revisit those places with a single click.
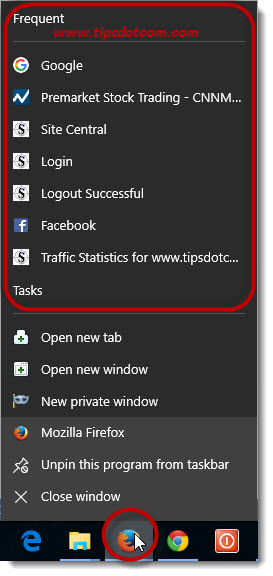
Needless to say that Internet Explorer or your preferred internet browser feature the same, convenient type of jump lists to help you to get things done quicker. A File Explorer icon on your taskbar offers you a jump list with direct access to folder that you often use and I would certainly recommend right-clicking your taskbar icons for any other application that you frequently use. Again, if you’re not sure how to pin those application icons to your taskbar in the first place, please feel free to read my article on pinning programs to the taskbar.
Jump Lists Location
The jump lists location on your hard drive (where the jump list information is stored on your disk) is in these two folders:
- %APPDATA%\Microsoft\Windows\Recent\AutomaticDestinations
- %APPDATA%\Microsoft\Windows\Recent\CustomDestinations
Don’t forget to enable your setting to display hidden files in order to see the contents of these folders. The %APPDATA% part of the path is dynamically built by Windows, so in order to view the contents of those two folders on your system, first press the Windows logo key + e on your keyboard to open up a File Explorer window.
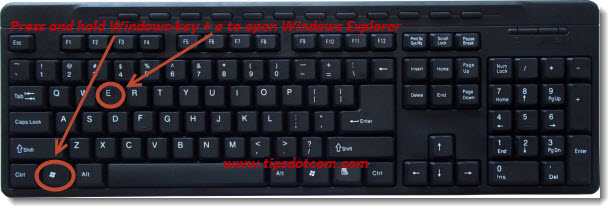
Next, copy the exact path like shown here:
%APPDATA%\Microsoft\Windows\Recent\AutomaticDestinations
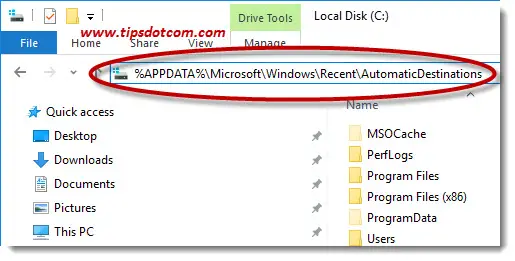
and then press ENTER.
This will show a list of entries that Windows uses to populate your Windows jump lists.
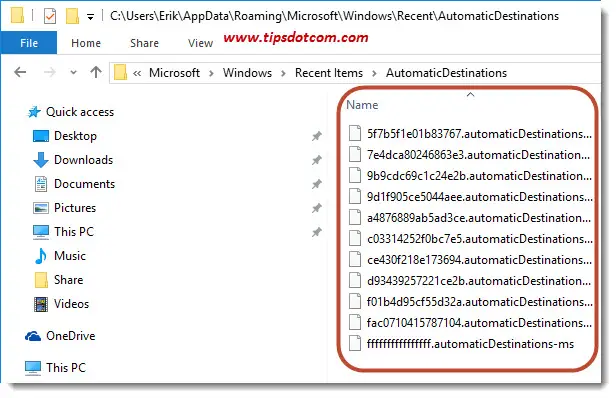
Unfortunately, the files are not really recognizable, so you won’t be able to directly recognize the similarity between the files and the actual items in your jump lists.
How To Clear Jump Lists
So the “coded” information in the above mentioned folders doesn’t directly translate to your jump lists, but if you’re wondering how to clear jump lists, these two folders are the key indeed. You can reset or clear jump lists by looking at the contents of the two folders (don’t forget to repeat the copy / paste scenario in your File Explorer address bar with the second folder – customdestinations - as well).
Simply select all the items in these folders and delete them to clear your jump lists if you share your computers with other users and don’t want them to be able to see what you’ve been working on recently.
However, if you’re sharing your computer with other users in your household, it might be a better idea to create separate accounts for each user.
If you've enjoyed this article or found it useful, I'd appreciate it if you'd let me know by clicking the Like (or Share) button below. Thank you!


New! Comments
Have your say about what you just read! Leave me a comment in the box below.